
Water damage ruins buildings. For metal building facades, preventing leaks starts with understanding where water gets in and how to stop it. Whether you're working with standard metal building facade cladding or perforated metal facade panels, the same principles apply. Proper design, careful installation, and smart details at vulnerable points keep water outside where it belongs.
Where Do Metal Building Facades Typically Leak?
Leaks rarely happen through the metal panels themselves. Water finds its way in at connections, transitions, and openings. Understanding these weak spots helps you design them out from the start.
Common Failure Points in Building Facade Systems
Panel joints are one of the most common leak sources. When two pieces of metal meet, you create a potential gap. Even with proper overlap, wind-driven rain can work its way through. The problem gets worse at corners where multiple pieces come together at odd angles.
Penetrations cause headaches, too. Every window, door, vent, or pipe that goes through your building facade creates an opportunity for water entry. The transition from one material to another, like metal cladding meeting a window frame, needs careful attention.
Water Infiltration Pathways
Water doesn't always leak where it enters. It can travel along the back of panels, following fastener lines or horizontal ledges. This makes finding the actual entry point tricky during repairs.
Capillary action pulls water into tiny gaps you wouldn't think could leak. Even hairline gaps can draw water inward through surface tension.
Material Expansion and Contraction Issues
Metal moves. On a hot summer day, a 40-foot steel panel can expand about 5/16 inch (≈8 mm) over a 100°F (≈56°C) swing, while aluminum can move about 5/8 inch (≈16 mm) over the same range. If your joints don't accommodate this movement, something gives. Usually, it's the sealant that fails first, cracking and pulling away from the metal.
Different metals expand at different rates. Aluminum moves about twice as much as steel for the same temperature change. Mix materials without proper isolation, and you're setting up for problems.
Design Issues That Lead to Leaks
Some designs just don't work in real weather. Horizontal ledges that catch water, insufficient slope for drainage, or sealed systems with no weep holes all lead to eventual failure. The building facade might look great when dry, but the first storm exposes the weaknesses.
Poor detailing around roof-to-wall transitions causes more leaks than most people realize. This area sees heavy water flow during rain, and if drainage paths aren't clear, water backs up and finds a way in.
How Does Metal Building Facade Cladding Prevent Water Intrusion?
Good cladding systems work with gravity and air pressure, not against them. The best approach assumes some water will get past the first line of defense and plans for it.
Rainscreen Principles and Cavity Drainage
- The rainscreen concept puts a drainage cavity behind your visible cladding. Water that gets past the outer panels hits a weather barrier and drains down and out through weep holes. Air circulates in this cavity, helping dry any moisture that does get in.
- This cavity is typically designed to be at least 1/4 inch deep (commonly 3/8 to 3/4 inch) for effective drainage. Anything less and you risk water bridging across to the backup wall through mortar droppings or debris.
Overlap and Interlock Systems
- Traditional standing seam systems interlock along vertical joints, creating a labyrinth path for water. Horizontal laps should shed water like roof shingles, with upper panels overlapping lower ones by the manufacturer-recommended lap (commonly specified by the panel system).
- Panel profiles matter here. Deep ribs create better drainage channels than shallow profiles. The metal naturally guides water down these channels toward weep holes at the bottom.
Sealant Application Best Practices
- Sealant isn't the primary waterproofing. It's a backup. That said, when you need it, proper application makes the difference between success and failure.
- Clean surfaces before applying any sealant. Oil, dust, or moisture prevents proper adhesion. Tool the sealant to ensure contact with both surfaces, not just bridging the gap.
- Joint size matters too. Most sealants need a width-to-depth ratio of 2:1. A 1/2-inch wide joint should be 1/4 inch deep. Backer rod controls this depth and prevents three-sided adhesion.
Flashing Integration Techniques
- Flashing redirects water to the outside face of the building facade. Every penetration needs it. Windows get head flashing to kick water out and away. Sill flashing catches any water that gets behind the window and directs it back out through weep holes.
- Continuous flashing at floor lines and wall transitions prevents water from migrating between stories. Step flashing works where metal cladding meets a sloped roof. Each piece overlaps the one below and extends under the roofing material.
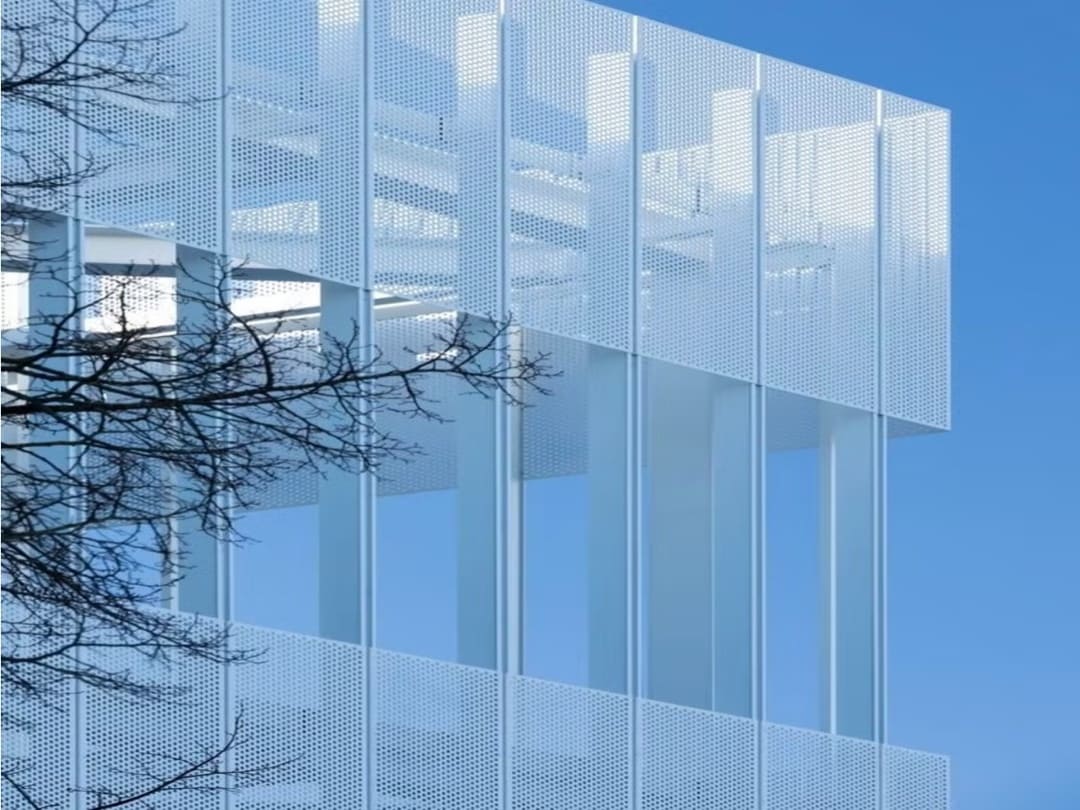
What Special Requirements Apply to Perforated Metal Facade Panels?
Perforated metal facade panels add visual interest but change how you handle waterproofing. The holes that make them attractive also let water straight through.
Drainage and Ventilation Benefits
The perforations actually help in some ways. Water doesn't accumulate on the panel surface. It drains through immediately. Air moves freely, promoting drying of the cavity behind.
This ventilation prevents condensation buildup that can happen with sealed systems. In humid climates, this airflow can be the difference between a dry cavity and a mold problem.
Waterproofing Behind Open Panels
You can't rely on perforated metal facade panels for weather protection. They are primarily architectural and act as a rainscreen, not a water barrier. All waterproofing happens at the backup wall behind them.
This backup wall needs a continuous weather barrier, properly sealed at all penetrations and transitions. Treat it like it's the actual exterior wall, because functionally, it is.
Perforation Pattern Considerations
Smaller, more numerous holes shed water better than large openings. A panel with 40% open area but tiny holes performs differently from one with the same percentage in larger perforations.
If you’re customizing patterns through a supplier such as Ansus Metal, align perforation size and open area with the project’s exposure level; smaller holes can help reduce wind-driven splash intensity against the backup wall.
Consider wind-driven rain. In exposed locations, water can blow horizontally through large openings and hit the backup wall with significant force. Smaller perforations slow this down somewhat.
Inner Backup Wall Protection
The backup wall bears the full brunt of weather exposure. Use weather-resistant materials rated for the climate. In coastal areas, this might mean marine-grade weather barriers. In cold climates, consider how freeze-thaw cycles affect your chosen materials.
Flashings at this backup wall need the same attention you'd give an exposed building facade. Just because it's hidden doesn't mean you can skip proper detailing.
How Does Proper Installation Ensure Leak-Free Metal Building Facades?
Perfect details on paper mean nothing if installation doesn't follow through. Field conditions test even the best designs. Following a systematic installation process ensures every leak-prevention detail gets executed correctly.
Sequencing and Coordination Requirements
Step 1: Establish the Correct Installation Sequence
Install from the bottom up, inside out. Complete the lower-level weather barriers and flashings first, then install the outer metal cladding. This sequence avoids having to remove already-installed materials to add base-level waterproofing and prevents compromising details.
Step 2: Coordinate All Trades
Hold coordination meetings before each trade begins work. Window installers need to know exactly where flashing laps and clearances should be. The cladding crew needs a detailed understanding of how their panels integrate correctly with already-installed window frames, door frames, and other elements. Early communication costs far less than rework later.
Quality Control Checkpoints
Step 3: Inspect Each Layer Before Covering
Conduct inspection and approval before each layer gets covered by the next. Once metal panels go up, fixing underlying waterproofing problems becomes exponentially more difficult and expensive. Focus on checking whether weather barrier laps are sufficient, flashings are continuous without gaps, and sealant joints are full and uniform.
Step 4: Verify Critical Transition Areas
Pay special attention to transitions where different materials and components meet. At these locations, have the project architect or engineer verify on-site that the installation fully complies with design intent and drawings. These junctions are often where problems occur most frequently.
Weather Protection During Construction
Step 5: Choose Appropriate Construction Weather
Never install waterproofing materials and sealants in the rain. Sealants won't adhere to wet surfaces, and weather barriers can't seal properly if installed in damp conditions. If the weather suddenly changes during installation, stop work immediately and protect exposed areas with tarps.
Step 6: Control Construction Temperature Conditions
Temperature matters equally. Most sealant products have minimum application temperature requirements, typically around 40°F (approximately 4°C). If you force installation in cold weather below this temperature, sealants can experience early adhesion failure. Check product specifications and follow them strictly.
Testing and Commissioning Procedures
Step 7: Conduct Mockup Water Testing
Test a mockup before large-scale construction. Use a project-appropriate field water test protocol (often based on ASTM E1105 at window/curtain-wall interfaces and critical transition areas), and test the mockup to verify the detailing works. This catches design or material selection problems early, before full installation, avoiding massive rework.
Step 8: Complete Field Acceptance Testing
Perform on-site water testing after complete installation, targeting windows, penetrations, and key transitions using the specified field test method. This confirms the facade assembly performs as intended with no obvious leak points. The advantage of testing while the crew is still on-site is that if installation errors are found, they can be fixed immediately without having to remobilize personnel and equipment.
FAQs
Q1. How Long Should Sealants Last in Metal Building Facades Before Replacement?
Most quality sealants last 10 to 20 years, depending on exposure and UV radiation. South-facing walls see faster degradation than shaded elevations. Signs of failure include cracking, hardening, loss of adhesion, or shrinkage and pull-away from substrates. Regular inspections every five years help catch problems early. In harsh coastal environments or extreme climates, expect shorter lifespans. Silicone sealants generally outlast polyurethane or acrylic options. Budget for systematic replacement before widespread failure occurs, as addressing failing sealants piecemeal costs more long-term than planned maintenance cycles.
Q2. What Insurance or Warranty Considerations Apply to Metal Building Facade Leak Prevention?
Most metal building facade cladding carries manufacturer warranties of 15 to 30 years for materials, but workmanship warranties often range from 1 to 10 years, depending on the contractor and project terms. Read the fine print carefully, as many warranties exclude water intrusion damage. Building envelope consultants recommend separate waterproofing warranties covering full assemblies, not just components. Some installers offer extended labor warranties if you use their maintenance program. Document everything during construction with photos and testing reports. Insurance claims for water damage often require proof that proper installation methods were followed and regular maintenance performed. Neglected maintenance can void both warranties and insurance coverage.
Q3. Do Building Codes Require Specific Testing for Metal Building Facades?
Requirements vary by jurisdiction and building height. The International Building Code references water penetration testing standards, while ASTM E1105 is widely used for field water testing of installed windows/curtain walls. Many localities require mockup testing before approving full installation on taller or higher-risk projects. Coastal high-wind zones often mandate additional testing per ASTM E283 for air infiltration and E330 for structural performance under wind loads. Energy codes may require air barrier testing. Special-use buildings like hospitals have stricter requirements than warehouses. Check with your local building department early in design, as testing adds time and cost to schedules. Failed tests mean redesign and retesting before proceeding.
Conclusion
Leak-free metal building facades result from understanding water behavior, designing proper details, and executing careful installation. Don't wait for leaks to appear. Review your building facade details now, ensure proper installation practices, and establish maintenance routines.
If you’re planning a new facade build or a retrofit, Ansus Metal’s range of architectural cladding options (from perforated sheets to facade panels) can be a strong starting point. Just pair the right product selection with disciplined flashing, drainage, and testing details for truly leak-resistant performance.
Share:
304 vs 316 Stainless Steel Architectural Mesh: Which Is Right for Me?
Safety vs Style in Decorative Metal Mesh Screens: A Practical Guide